
Signs Your E-Bike Battery Is Failing
Reduced Range: How Far You Can Go
Range is the most direct measure of battery health. A lithium ion pack that once carried you 80 kilometres might quietly shrink to 50, then 30. That loss does not follow a straight line; it accelerates as cells degrade unevenly. I notice it on familiar routes, the hill that used to be manageable now demands pedalling earlier.
Compare your current distance against the original specification. That requires tracking, not guessing. A battery that loses 40% of its capacity has already entered a critical zone. This directly relates to electric bicycle battery replacement timing.
- Charge cycles beyond 500
- Voltage sag under load
- Charging time increases by over an hour
These signs compound. When your range drops to half of what it was, electric bicycle battery replacement becomes the practical option. The remaining capacity also places additional load on the motor, forcing it to draw higher current from weakened cells. That accelerates decay.
Extended Charging Times and Early Shutoffs
There is a quiet betrayal in the charging cable that takes an extra hour, then two, to do the same work. The battery is not refilling; it is negotiating. When a pack once reached full capacity in four hours and now demands six, the chemistry inside has begun to labour. This is the first visible sigh of a system losing its internal rhythm.
The second warning is more disorienting. You are riding, the display reads 45 percent, and then the motor cuts out completely. There is no gradual wind-down, no amber light. A protective circuit has decided the cells cannot safely deliver the requested current, so it severs the connection to save itself. This premature shutoff often appears during a steady climb or a strong headwind, exactly when you need power the most.
Consider these mechanical realities as you assess the unit:
– Charging time consistently exceeds the original specification by 60 minutes or more.
– The battery powers off even when the state of charge reads above 30 percent.
– The cutoff occurs most often under moderate acceleration, not just at full throttle.
These events share a root cause. The cell groups have drifted apart in their internal resistance. One weak cell forces the others to work harder, and the management system cannot permit that imbalance to continue without risking thermal damage. A shutdown at 45 percent is not a software quirk. It is a physical limit.
When the charger runs longer and the ride ends earlier, the entire relationship between throttle and motion becomes unpredictable. You begin to plan routes around the void, carrying a second pack or avoiding longer loops. This uncertainty, more than the mileage loss, erodes the freedom that drew you to the machine in the first place. The chronology of decay is written in these small failures, and the only responsible answer is electric bicycle battery replacement.
Physical Signs: Swelling, Heat, and Odor
A swollen battery case is the most direct evidence of internal failure. If the pack no longer sits flush in its frame mount, or the plastic feels tight and rounded, the cells are off gassing. This is not cosmetic. The casing deforms because pressure is building from within, and that pressure has nowhere safe to go. Heat tells the same story. A battery that remains warm for hours after charging, or that turns hot to the touch under a light load, is generating energy as waste. The smell is the final clue. A sweet, chemical odour near the charging port or the battery bay signals electrolyte leakage. At this point, the cells have breached their sealslint and the unit must be treated as hazardous. When these physical signs appear, electric bicycle battery replacement is not a maintenance option. It is a safety requirement. A compromised pack cannot be nursed back to health, and no amount of careful riding changes what has already broken inside.
Voltage Drop Under Load: A Diagnostic Test
Voltage drop under load is the measurement that counts. A battery may show a full charge at rest, yet sag dramatically when you twist the throttle. This reading, taken properly, exposes the real health of each cell.
Use a multimeter and a steady incline. Charge fully, attach the leads, then climb at full assist. A healthy pack dips 2 to 3 volts. A failing pack drops 8 volts or more, sometimes triggering the low voltage cutoff.
– The pack reads above 54 volts at rest.
– It plunges below 42 volts under load.
– It fails to recover after thirty seconds.
These numbers signal the end. The cells cannot hold chemistry under demand. Flat riding might hide the issue, but South African hills will expose it daily. Electric bicycle battery replacement becomes the only logical step. The test is honest. It ignores how the bike rode last week and shows what the pack can deliver right now.
Selecting the Right Replacement Battery for Your Electric Bike
Voltage and Ampere-Hour (Ah) Compatibility
Most riders never open the battery compartment until the motor dies mid-climb. That moment is unforgiving, especially on a steep Johannesburg street. Choosing the right electric bicycle battery replacement is not a guessing game. Voltage must match the original pack exactly. A 36V motor will not forgive a 48V replacement. The controller senses the surge and shuts down, or worse, burns out silently. Ampere-hour rating should equal or modestly exceed the old pack. Higher Ah extends range, but physical dimensions and connector type must also align.
Key compatibility points include:
- Nominal voltage printed on the controller or charger
- Ah capacity and cell chemistry, typically lithium-ion
- Connector orientation and plug shape
The charger matters equally. A mismatched charger can overcharge the new pack and shorten its life. Match charge voltage to the battery rating. A correct electric bicycle battery replacement protects the motor and your safety.
Form Factor and Mounting Locations
Nobody thinks about the battery compartment until the replacement arrives and refuses to fit! That moment of silence, staring at a pack that is technically correct but physically impossible, forces a reckoning with reality. The form factor of your electric bicycle battery replacement is not cosmetic. It is the difference between a clean installation and a tangle of wires.
Mounting locations vary. Some bikes hide the battery inside the downtube, others strap it to a rear rack, a few mount it under the seat. Each location demands a specific shape and locking mechanism. A rack battery will not slide into a frame cradle. A downtube pack will not balance on a rear carrier.
- Mounting bracket dimensions
- Locking mechanism orientation
- Cable routing path
I have seen riders force a pack into place, stripping connector pins. Physical fit is the first test of any electric bicycle battery replacement.
Battery Chemistry: The Lit-Batteries Explained
Over 90% of e-bikes sold today rely on lithium-ion cells, yet the exact lithium variant determines performance. In South Africa, local heat accelerates degradation in certain chemistries, which matters when planning an electric bicycle battery replacement. Lithium-ion packs offer high energy density and light weight. Lithium iron phosphate (LiFePO4) tolerates higher temperatures and survives more charge cycles, though it weighs more. Lithium polymer allows unusual shapes for compact frames but requires strict voltage oversight.
Consider this before purchasing:
- Lithium-ion suits daily commutes and flat terrain.
- LiFePO4 works best for cargo bikes and hot climates.
- Lithium polymer fits custom builds with limited space.
The chemistry you choose determines the lifespan and weight of the replacement.
Certifications and Safety Features to Look For
Certification failure rates among imported e-bike batteries are alarmingly high. When planning an electric bicycle battery replacement in South Africa, certifications separate safe purchases from dangerous ones. The SABS mark legally recognizes compliance with local standards. Internationally, UN38.3 certification confirms safe transport. Safety features inside the battery management system (BMS) matter too.
- Overcharge and overdischarge cutoff circuits
- Short circuit protection with automatic reset
- Thermal cutoff switches that activate at 60 degrees Celsius
I always inspect the connector type. A cheap connector creates resistance and heat. That heat adds real risk! The BMS should balance cells individually. Buy from suppliers who provide test reports for each batch. This diligence ensures your replacement performs safely in our hot climate.
OEM vs. Aftermarket Replacement Batteries
The aftermarket battery market in South Africa offers lower prices, but those savings come with hidden trade-offs. Choosing the right electric bicycle battery replacement means deciding between OEM precision and aftermarket flexibility. OEM batteries come from the original manufacturer, so they match your bike’s BMS communication protocols exactly. Aftermarket options require closer inspection. I have seen units with mismatched cell ratings and incorrect connector pinouts.
Some aftermarket suppliers do produce reliable batteries. They use reputable cells and provide batch test reports. The difficulty is identifying them. A short checklist helps:
- Does the supplier verify cell capacity and internal resistance?
- Is the housing rated for water and dust ingress?
- Are the connectors compatible with your bike’s existing wiring?
OEM remains the safest choice unless you can validate the aftermarket unit thoroughly. Your replacement should not introduce uncertainty into your daily ride.
A Step-by-Step Guide to Swapping Out Your E-Bike Battery
Tools You’ll Need and Pre-Installation Safety
Swapping out a battery might seem straightforward, but the process involves more nuance than simply unclipping a latch. A rushed replacement can damage the delicate BMS or short the connector pins. Most e-bike batteries last between 3 and 5 years, so the removal procedure matters as much as the new unit you install.
Before you touch a single screw, power down the system completely and remove the key from the ignition barrel if your model uses one. Failure to disconnect the display first can leave a residual charge in the controller, which is dangerous when unplugging the main harness. Also, perform the swap in a dry, clean area. Dust and moisture are the enemies of high voltage connections, especially in South Africa’s varied climate.
You will need a few specific items to do this properly:
- Metric hex wrenches or Torx keys, depending on your bracket bolts
- A plastic pry tool for releasing tight rubber gaskets
- Isopropyl alcohol wipes for cleaning the contacts
- A multimeter to verify the new pack’s voltage before connection
Now, locate the mounting bracket and inspect the slide rails for grit. When you release the battery, support its weight with your free hand immediately, especially on frame-integrated models. Do not let it dangle from the wiring harness.
Once the old unit is free, examine the female connector on the bike. Look for bent pins or blackened scorch marks, which indicate a poor connection. Clean the terminals with the alcohol wipes and let them air dry completely. This step ensures that your electric bicycle battery replacement performs at peak efficiency from the first ride.
Align the new battery carefully on the rails. It should slide in with moderate resistance, not forced. A sudden drop or a hard push can crack the casing or misalign the internal cells. When you hear the latch click, give it a firm tug to confirm the lock is fully engaged. Connect the power cable last, ensuring the connector seats flush.
Finally, double check that the charging port cover is secure. A loose flap invites water ingress, which voids most warranties. Your electric bicycle battery replacement is now complete, but a quick test ride at low speed will confirm that the motor pulls smoothly without hesitation. The secret to a long service life lies in this careful, methodical approach to installation.
Removing the Old Battery from Your Frame
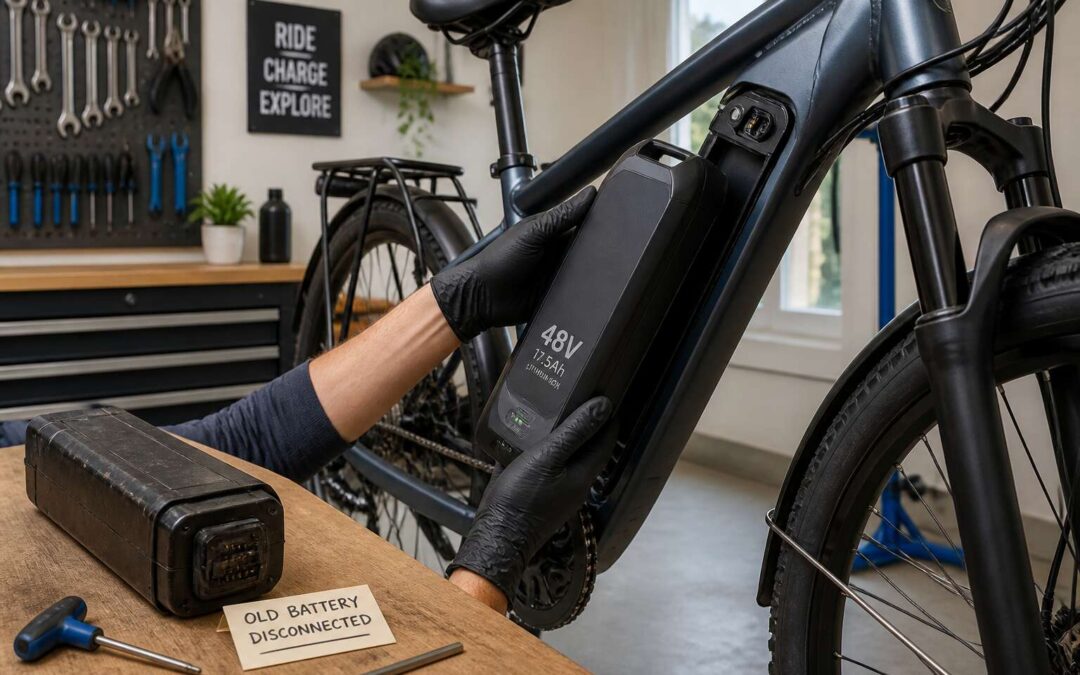
The moment of release demands patience. After securing your workspace and verifying a powered down system, approach the mounting bracket with steady hands. Place one palm under the battery’s base before touching the latch. Gravity is unforgiving when a fully charged pack slips.
Your electric bicycle battery replacement begins with this extraction. Inspect the slide rails for accumulated grit or rust. A soft brush clears debris without scratching the anodised surface. Then, gently press the release mechanism. Some models require a twist, others a slide. Support the unit’s weight continuously.
Once free, set it aside on a non conductive surface. Examine the connector housing for bent pins or moisture traces. Use the isopropyl wipes to clean both the bike’s socket and the new battery’s plug. Let them dry fully.
- Disengage the locking tab.
- Lift the battery vertically off the rails.
- Pull the cable connector straight out, never at an angle.
Reversing these steps installs the new pack. The click of the latch confirms engagement. A proper electric bicycle battery replacement leaves no play in the mount. This methodical electric bicycle battery replacement avoids damage to the BMS.
Disconnecting the Wiring Harness Correctly
Most electric bicycle battery replacement guides treat the wiring harness like a stubborn shoelace. Yank it, and you might be fine. Yank it, and you might also be shopping for a new controller. The connector block, that unassuming plastic plug, is where the BMS, the battery management system, and your bike’s brain exchange vital data. Mishandling this junction is the top cause of mysterious electrical gremlins after a swap.
First, locate the connector. It should sit within a few inches of the battery cradle. Do not pull the wires themselves. The strain relief inside the housing is delicate. Grip the plug body firmly, or use a flathead screwdriver to gently pry the locking clip if it resists.
– Wiggle the connector side to side, not up and down.
– Apply steady, even pressure; do not jerk.
– Check the gasket for cracks or dried out seals before mating the new unit.
Once disconnected, treat the pins like precision instruments. A bent pin can short the entire system. Use isopropyl alcohol and a lint free cloth to remove oxidation from the socket. Let the solvent evaporate completely. This step, often ignored, prevents voltage drops that masquerade as battery failure months later. The new pack’s plug should slide home with a seamless click. If it fights you, stop and inspect for debris. Proper electric bicycle battery replacement hinges on this quiet, careful moment. The harness will thank you with years of reliable power transfer, and you will never have to explain to your riding buddies why your motor cut out at 40 km/h.
Reinstalling the New Battery: Snap or Screw?
Reinstalling the New Battery: Snap or Screw?
Most modern e-bikes use a snap-in cradle. You slide the pack down until the latch clicks. Some require a key turn, meaning the lock doubles as the retainer. Older cargo bikes often use screw-secured mounts. These need a hex key or socket wrench, and overtightening can crack the housing.
The rule for electric bicycle battery replacement is simple: listen and feel. A snap mount should click with one smooth motion. A screw mount should turn freely until the last quarter rotation. If it binds earlier, check for grit on the threads.
- Check the mounting rails for dirt first.
- Align the guide channels with the tracks.
- Push until the latch engages or screws seat.
A loose battery rattles on rough tar and can lose connection over potholes. A seized mount stops you from removing the pack for charging. Getting electric bicycle battery replacement right means the mount carries the daily load!
Calibrating the Battery Management System (BMS)
Swapping a pack sounds simple. Slide out the old, slot in the new. But the Battery Management System holds memory of your old battery’s state of charge, voltage curves, and fault history. Skip the calibration step and new cells may charge to only 80% or shut off early.
Here is the sequence I use for electric bicycle battery replacement:
- Power down the system and remove the key.
- Disconnect the wiring harness at the main connector.
- Install the new pack and reconnect.
- Plug in the charger and run it for two full hours.
The BMS recalibrates by observing a complete charge cycle. This is not a formality. An uncalibrated BMS can overestimate state of charge by up to 12%.
Once the charger cycles off, do a full discharge at moderate assist. The BMS then maps the new pack’s true capacity.
First Charge and Test Ride: What to Expect
The first charge after an electric bicycle battery replacement determines how the BMS will read the new pack. Expect the charger to run longer than the usual two hour cycle, because the BMS needs to observe the full capacity. When the charger clicks to green, take the bike out at moderate assist. Do not chase top speed. Let the pack work through its voltage curve. Watch the display for sudden sag. That would indicate an unbalanced cell. Here is my sequence for that first ride:
- Ride for ten minutes at level two assist on flat ground.
- Stop and let the bike idle for a minute, then check the battery readout.
- Turn around and finish the ride at the same assist level.
The accurate range appears on the second full discharge. Only then can you trust the estimate.
Extending the Life of Your Replaced E-Bike Battery
Optimal Charging Habits for Daily Use
After an electric bicycle battery replacement, your daily charging routine determines how long the new pack retains capacity. Lithium cells prefer partial states of charge. Keeping the battery between 20% and 80% for regular commutes reduces internal stress and slows capacity fade.
South African heat adds a real variable. High temperatures accelerate chemical degradation, so choose a shaded spot for charging. I always unplug the charger once the indicator reads full. Leaving it connected overnight forces cells to sit at maximum voltage. That single habit prolongs the battery’s useful life more than any fancy maintenance routine!
Temperature Storage and Winter Care
Extreme temperatures are the silent enemy of any replacement battery. In South Africa, summer heat can degrade cells faster than years of riding, while winter mornings in Gauteng or the Cape can cause voltage to sag unexpectedly. I have seen perfectly good packs lose range simply because they spent the night in a cold garage.
For long-term storage, keep the battery in a cool, dry place, ideally between 15°C and 25°C. Charge to about 60% before leaving it unused for weeks. Let the pack reach room temperature before charging after a cold ride. Condensation inside the casing is a real hazard. Storing fully charged or completely flat invites capacity loss. Treat temperature like a precious resource. Your electric bicycle battery replacement will thank you for a consistent environment, not a dramatic one.
Off-Season Maintenance: Keeping the Battery Alive
Off-season is a quiet period, but not a dormant one. A replaced battery needs attention even when the bike sits idle. Corrosion on the charging contacts is a common culprit that shortens lifespan. A dry cloth and a thin layer of dielectric grease keep the connection stable.
The mounting cradle deserves a look too. Dust and grit accumulate over time, causing micro-abrasions that loosen the connection. Check the wiring for rodent damage, especially if the bike lives in a garage or shed.
Certain factors determine how well an electric bicycle battery replacement survives the off-season:
- Contacts that stay clean and oxidation-free.
- A casing without hairline cracks.
- Chargers that remain disconnected when unused.
Neglect is the biggest risk. A battery left connected to a powered charger for months will overwork its BMS. Disconnect it and place the pack in a dry, shaded spot. Your electric bicycle battery replacement will be ready to ride when the season turns.
Disposing or Recycling the Old Battery Responsibly
Local Regulations and Hazardous Waste Rules
The spent lithium pack is not a neutral object. It is a sealed repository of heavy metals and reactive chemistry. Tossing it into a municipal bin in Johannesburg or Cape Town creates an environmental debt that the landfill will pass on to groundwater and soil. The act of disposal forces a confrontation with the true cost of mobility.
South African regulations classify lithium batteries as hazardous waste. This designation is not a bureaucratic hurdle. It is a recognition of the cathode’s potential to leach cobalt and nickel into the water table. Your local municipal facility often lacks the specialized channels for this type of waste. You must find a dedicated e-waste handler. Many bicycle shops that perform an electric bicycle battery replacement will accept your old unit for recycling if you are purchasing the new one from them.
When you deliver the pack, you should verify the handler’s compliance with the National Environmental Management: Waste Act. A certified facility will often do the following:
- Discharge the pack to a safe voltage before dismantling, which prevents fire risks in transit.
- Separate the cells for mechanical shredding to recover black mass for smelting.
- Document the transfer to ensure the responsibility moves off your shoulders legally.
The residual value in that old battery is significant, and a responsible disposer will treat it as a resource. Hoarding it in a garage invites thermal runaway. Dumping it invites fines. The only ethical path is the certified bin. It is a quiet act of completion for the entire electric bicycle battery replacement cycle. The new pack arrives with a clean conscience attached.
Where to Bring Used Lithium-Ion Batteries
Once the electric bicycle battery replacement is complete, the old lithium unit still needs a destination. I start with the retailer or manufacturer’s service centre. Some offer take-back programs for their electric bicycle battery replacement customers, though availability shifts by region. The more reliable route is a dedicated e-waste facility. Search for one registered under the National Environmental Management: Waste Act, and confirm they handle lithium chemistry specifically.
A quick phone call before you drive over saves a wasted trip. Ask these questions:
- Do you accept sealed lithium-ion packs from e-bikes?
- What documentation do you provide for the transfer?
- Is there a fee for drop-off?
Some municipal sites host periodic hazardous waste collection days, but these are inconsistent. The certified handler remains the dependable option, and the peace of mind is worth the effort.
State and National Battery Recycling Programs
South Africa’s national battery recycling programs are taking shape under the extended producer responsibility regulations. These rules require battery importers and manufacturers to fund collection and recycling networks. For anyone completing an electric bicycle battery replacement, this means the old unit falls under a formal stewardship system, not a casual scrap bin.
The EPR framework establishes several obligations:
- Producer registration with the national environmental authority
- Annual reporting of battery volumes placed on the market
- Financing of drop-off and recycling infrastructure
A few programmes stand out. The Recycling Vehicle Batteries association handles lead-acid units, while lithium-ion packs are increasingly accepted by certified e-waste recyclers registered with the Department of Forestry, Fisheries and the Environment. Provincial departments often maintain lists of approved facilities.
Participation in these national programs is growing. The EPR framework creates a verifiable chain, giving you documentation when your electric bicycle battery replacement is done properly. The system removes ambiguity and shifts responsibility onto the producer.